Tuesday 30 October 2012

Post 48 New toy

What do all good marketers say - "buy on emotion and defend on logic". You see I've bought a small kiln. Now I'm a two kiln potter!!!

So my defence of this latest purchase is the intrinsic value I will get out of being able to do small scale firings for glaze, firing schedule and clay body testing. Fire a small number of samples, evaluate and test again without having to wait for the bigger kiln to have a nearly load ready or otherwise fire underloaded. This little one is certainly too small to fire all but the smallest bonsai pots. And how did I get it past the Senate Estimates Committee - well what all good long serving workers would do - make a claim on prior unrealised accrued benefits. It worked for me.

It's a Woodrow Minifire kiln with a firebox that is only 300 x 300 x 150. It comes with its own controller and runs on 240v so just plugs straight into a regular wall socket. At 1800 watts it's like running a big room heater for the duration of the firing, except the 'room' is just that little firebox. No wonder it can get up to 1280C in there.

In the picture you can see I've mounted it on a small trolley so it can be wheeled away and stored, works well. It only weighs 25 kilos but there's just no way to pick it up. That little white plug on the top is the vent.


It's had it's first test firing - I took those clay body additive test samples of Post 47 through the glaze firing schedule. The little programmable controller works a treat.

Thursday 25 October 2012

Post 47 Slumping test

Some time ago I posted about Pyroplastic Deformation with a picture showing how the bisqued clay could deform under the glaze firing conditions. That test sparked a little research and an idea to test a number of ceramic materials as additives to the clay body to assess any impact on the slumping character.

I started with 8 materials, then realised I needed a control sample, then read about grog and silica sand. That resulted in 10 samples, listed in the table below.


Thes pictures show the sample bars arranged in 'bend order', best at the front to worst to the back, in the above picture and clearly left to right below.


It is interesting to observe a change in colouration too. The bars which have deformed the most have darkened in colour. The additives in these bars have obviously 'fluxed' the clay; in effect enabling the clay to mature at a lower tempreature than without the additive. The one doubt about this conclusion is that the worst two have relatively high water absorption or porosity (for stoneware).

At the other end of the scale, the two sand additive bars, have shown the lowest deformation and the highest absorption, which will eliminate these as prospects. The control absorpton result was 0.8% which is very good.

For the best 8 samples the deformation difference between them isn't really signifiacant. So if that's the case then the next level of selection is water absorption. On that basis Kaolin is the one that stands out. Perhaps this should be no surprise as Kaolin is basically quite refractory and is a key ingredient in high firing ceramics.You might expect that it would elevate the maturity temperature, but the absorption is unchanged for the control sample.


Further reading suggests that you may need to get to 10% additive before really seeing the impact of many materials. I can feel another test series coming up - next time to evaluate a number of different levels of Kaolin addition and bringing in another test - shrinkage as an additional indicator of maturity.


Sunday 21 October 2012

Post 46 Four more new pots

I'm catching up on my backlog of bisqued pots. Only 2 more on the shelf now so will need to get on and make more.

The extensive glaze development and trial work has paid off. I have a couple of formulations now that will produce good stable outdoor glazes, with subtle tones and a surface with just a hint of satin. With the investment in time and resources to get these larger pots to bisque, it is a leap of faith to take a glaze that looks ok on a 35 x 50 test tile and put it on a pot. The dynamics in the kiln can produce a contradictory result. But fortunately with these 4 the result has been very close to the test result and just what I've been aiming for.


Pot 26 First of this new design and a little shape challenged without the external rim. I'm going to have to put one on the inside in future. The glaze is great and one I will certainly use again. The pot is 335 x  235 x 77, a little smaller than the others that follow.


 Pot 22 Came through really well and a good glaze. This more traditional pot shape seems to call for a darker colour and the brown works well. Final size at 377 x 274 x 91.


Oval Pot 24 with a nice differentiated cream/beige glaze breaking to sienna has the appearance of patination. I have profiled the pot wall with a lapstrake pattern to get that break and it has worked out well. Final size is 410 x 299 x 84.


Pot 18 has been hanging around for a while waiting for its turn in the kiln again. The wait was all about getting the right darker toned glaze which took some trial work. Same shape as no 22 finished up at 380 x 278 x 91. The picture doesn't do the glaze justice; a very attractive finish with evocative colours that shift with the lighting.

I made 2 new pots last week, currently drying, which takes the number to 30. 30 pots over 18 months has been a good apprenticeship and while the learning goes on I have reached a point where I think I can with some confidence in the result, turn out saleable quality pots.

Saturday 20 October 2012

Post 45 Root over rock, rock

Fired stoneware has a hardness of about 6 to 7 on the 10 point mohs scale. Silicon and glass are about 6 and so another reasonable comparison is granite rock. It's pretty tuff stuff. Firing to vitrification really does turn clay into stone. Anything you make this way will pretty much last forever.

So I though if you are actually making a rock like substance why not create a rock for a root over rock bonsai styling. Many years ago I was in northern NSW around Ashford where there are plentiful limestone deposits - and caves. I picked up a piece which had a very interesting pattern of rainfall erosion that looked like someone had run their fingers over the surface of a piece of clay.

I new there was a reason for keeping this rock, apart from the fact that it is now half submerged under a ficus. It has now been a point of inspiration to create an entirely new one.

Here it is at about 250mm high - the 'ghost rock'.


I think this is the front and the next one is a shot of the RHS.


In the mind of the observer things in a particular context are always what they seem to be. So what looks like a rock will be one when in place with a plant on it.

I had in mind that I would secure the tree in that depression on the side. There are plenty of 'flow paths' for roots to engage in as they head down. I've also made some holes in the side at the base to secure it to the pot. A friend has given me a few Natal Figs and so now I need to get  on and plant them in some long plastic tubes for a year or so. You have to be patient in this bonsai world, and plan well ahead! Ah the joys of anticipation.

Its probably a travesty but just for fun while messing with clay the other challenge I set myself was to create a waterfall viewing stone - Suiseki. I wanted to test both a black and a white glaze and so what better testbed.

 This is the front.
 And the back.

A diaza do you think. Well only if I have nothing more important to do.

Speaking of which I have 4 new pots just emerging from the kiln, watch this space - as soon as I get the photos cropped. With this batch I think I have just about reached a point with pot and glaze, where there is some light at the end of the tunnel.


Tuesday 16 October 2012

Post 44 Tanuki

I worked on my ceramic tanuki today. I didn't disturb the roots of the plants too much and wound the trees onto the deadwood, into the prepared grooves.

For the first one, the Daintree Pine (Gymnostoma australianum), the little tree was quite fragile and so I used graft tape to secure it to the 'deadwood'. Wiring the branches was a little challenging and I tried to preserve as many as possible to get the growth and recovery into the trunk. It looks good already with the live vein of trunk snaking around the deadwood trunk. There is about 60mm of trunk under the potted surface and once it recovers and gets growing I'll do a subsurface layering debark to get a nebari starting at the right height. When finally potted the fingers of the hand shape will be under the surface of the medium.


 The second one is with the little Juniper. The tree needs to grow another 60 to 70 or so mm to do one more loop before it is into clear space. Junipers are very flexible things and with a little preflexing it was relatively easy to position. The twine wrap followed the attachment to secure it in position. Only two front and one rear branchlets survived so there is a bit of recovery and growth to do before any more work. The base of the trunk fitted tightly and will engage very quickly. This one also will be planted so that the 'fingers' of the deadwood are submerged in the medium. 


I've been encouraged so far and will probably make more. I have a couple of junipers that have been in training for years and it might be nice to try and make a deadwood that would fit the trunk as currently shaped. Using some swampies is pretty appealing too, given their flexibility and potential growth rate.

Here in south east Queensland deadwood has a half life of about 5 years if you are lucky. It's a real challenge and demands constant attention and treatment to keep ahead of the fungi and keep the wood in sound condition. This is particularly the case if the wood in question is not from a slow growing, tight grained, oil filled species and we don't have any of those which are endemic in this environment.
I'll post these again in time, as the wraps come off.

Monday 15 October 2012

Post 43 New pots

I fired the kiln over the weekend and finished off three new pots. As well as the pots there were a few other bits and pieces of fun. These included my deadwood models and a couple of 'rocks'. The deadwood are in this post.

Ceramics can be a cruel teacher and I was given a lesson in this firing. You do something to try to slove a problem and this gives you an opportunity to learn something new or otherwise to get some reinforcement of something you already knew. I had read somewhere about a strategy to support works during firing by using small pads of fresh clay under the bisque work in preparation for the glaze firing. Ok I can do that I thought and formed small balls of clay and then pressed the pot onto these pads which deform as they flatten slightly.

What happens when you have a large pot that is going to contract during firing is that the pads must slide across the shelf with the pot to stay in place, or have the pot slide over the pad. If the pot contracts and the pad surfaces bind to shelf and pot then it will be encouraged to rotate if it cannot slide. As it rotates it presents a taller profile and lifts the pot off the shelf. If this doesn't happen evenly then you put a wriggle into the pot at a time when it is at its most plastic!
I got away with it for two of the pots but not the third. Lesson learnt.

Here is the wobble pot, an oval at 405 x 300 x 82
 

You have to show the good with the bad so here it is. Take a good look and take in the lesson, this is the last anyone will be seeing of this pot. It's headed for the big nursey in the sky! That said the glaze is great and I will use it again for sure; a nice mottled greenish pastel satin.


 The next pot, a similar oval of the same size. Its come out in great shape and the glaze is an opalescent blue green satin. Good finish.


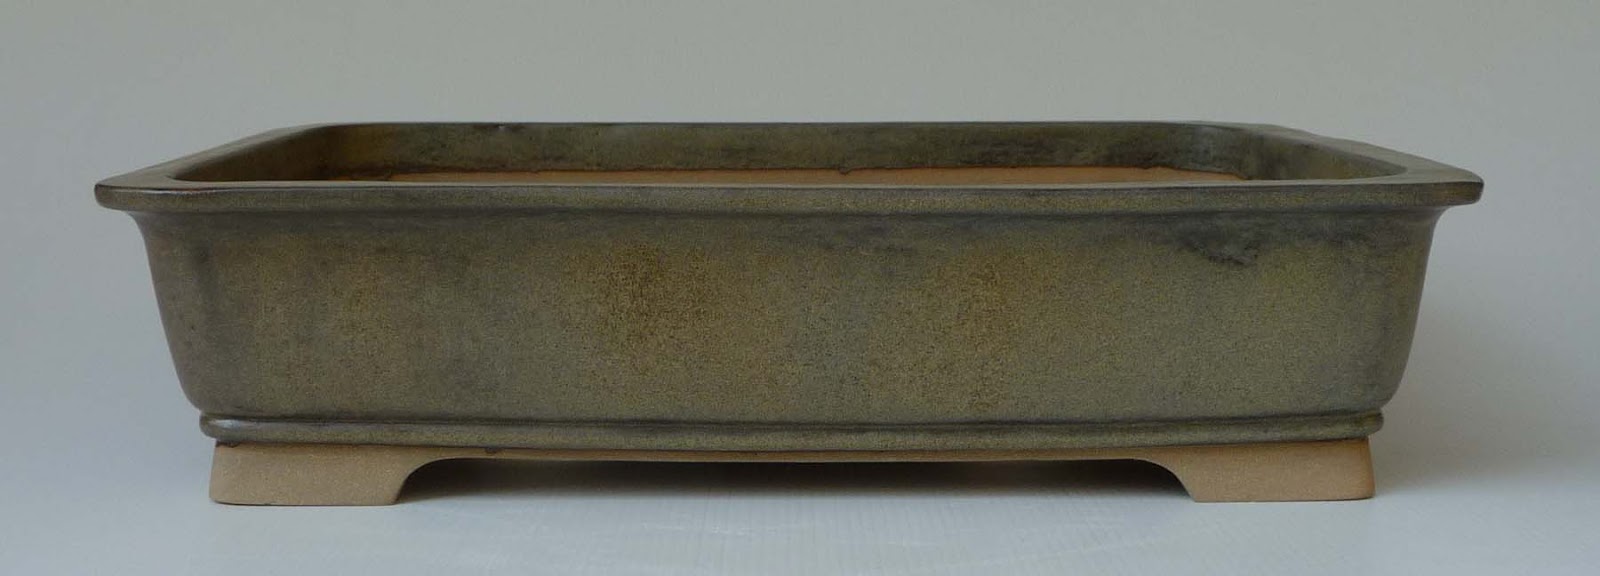
The third pot is a smaller rectangular tub pot, 360 x 255 x  71. Also in pretty good shape with an off white/beige satin glaze. Another glaze keeper.


I posted some shots a while ago of some mock juniper deadwood models I made - designed to have a live tree attached like a phoenix graft. In this firing I took them through to maturity. They should now stay nice and clean in service and never rot!  I'd really like to grow junipers on them but it will take a lifetime for them to be any size. I have been thinking about Swamp Cyprus. They grow a bit faster,  would lock onto the 'deadwood' quickly and have a good bark colour and texture. I went to Bunnings this week and saw some Daintree Pines - a native tree from the  North Qld wet tropics. Very attractive fine foliage like a Casuarina. I bought two and will now get them attaced soon.


Deadwood 1 front - about 200 high


And from the RHS.


Here's a little textural detail.


Deadwood 2 front, about 250 high.


 And also from the RHS.

 When I get the Daintrees installed I'll post them here.

Monday 8 October 2012

Post 42 Ficus root pruning


I started this Ficus Benjamina 'Baby Ben' from a sprig of a cutting in a rolled up plastic tube in 1988. There is a rock somewhere under all those roots. Here it is now in its beautiful spring foliage.

 The conventional wisdom about the timeing for root pruning ficus generally suggests the warmer early summer months, typically November, as preferred over spring. In the past I've tended to do the deciduous varieties just before the onset of spring - usually in the last 2 weeks of August and then follow up with the figs at the end of September. I don't like the idea of a full prune for a tree, top and tail, when it has just produced a flush of new growth, and then might be exposed to early high temperatures as we often see in October, ie mid 30sC.

This year things looked like they were moving a little early so I started my root pruning campaign around August 12. See Post 31 from August for pruning pictures. I did the figs last but they were done by August 22 when overnight temperatures were still getting to 10C to 12C and low to mid 20Cs during the day. The prune involved a full defoliation, branch structure and roots with the root mass being cut back to about one third of the depth and a good 30mm slice all around the edges but not bare rooting.The warmth of the days was no doubt sufficient to get them through this treatment so early but they have got away again looking great, sufferered no dehydration stress, and the renewed growth can be used for development rather than indiscriminantly cut off.

The pot I'm afraid to say is an inexpensive typical glazed chinese pot. Well I needed a big one to hold the tree and it still works. Fortunately the glaze surface has weathered in the 10 or more years I've had it, taking  a little of the shine off. That can happen if the glaze is less than a stable formulation.

Saturday 6 October 2012

Post 41 Flowers make you feel good

They do don't they. Keats certainly got it right about a thing of beauty being a joy forever. There's nothing like the sight and perfume of flowers to lift your spirits and put a smile on your face.

It's clivia season here at the moment. This wonderful species which comes from Southern Africa has been intenesively hybridised for years and is now available in a variety of hues well beyond the original orange red. They are fantastic plants needing not much more water than rainfall and they thrive anywhere out of full sunshine.

This one is a SA hybrid that I grew from seed. It has beautiful salmon tones but unfortunately no perfume. The pot is a nice hand painted majolica.


And this is a Chinese hybrid. The Chinese specialise in variagation and small compact plants which can be grow indoor all the time. This one only has a small amount of variagation but is an attractive plant with a nice well presented head of flowers.


Thursday 4 October 2012

Post 40 New page, new design

Getting to my 40th Post seemed to be a good milestone to smarten up the blog design. Previously the page font just didn't go with the background and at times it was a little hard to read. I trust you find it a little easier on the eye now.

And with the new design, a new page to go with the Home page and Gallery. It's tabbed as Creative Foundations and is a little reflective musing about aesthetics, craftsmanship, the challenges and practicalities of potting, as well as a little about pot selection.

I fired the kiln today and so now have 8 pots waiting for glazing. Its about to get interesting again.

Monday 1 October 2012

Post 39 New pots drying


Today I have some new pots that have been drying for a couple of weeks and are just about ready to bisque.

The first is another of the oval I’ve made before but with a boat like fine clinker finish. It’s 440 x 320 x 90. 

 
The second is a cut down rimless version of an earlier model with more compact feet. The result is a pretty attractive tub with nice proportions. Dimensions at this point are 390 x 290 x 75.


And the last one is from a new mould, with a minimalist contemporary look and integrated foot. It’s 370 x 260 x 83.


Speaking about boats I’m thinking about Japanese boat names to label my pots. There are a number of traditional inshore fishing vessels that would be good candidates. Here’s a picture of a taraibune which would be a good name for a rimless oval!


These pots and one other are in the kiln and ready to go but just need a little longer to be thoroughly ‘warm’ dry. I’ve also got a number of test bars in there which have an assortment of additives to eventually test for deformation at maturity temperature. I made a couple of new ones up this week with additions of different types of sand.


From quite early on I cut the size of the shelves down. This was after doing a cone test on each shelf during a firing. With the shelves extending closer to the walls there was a quite large temperature differential from top to bottom which does not exist with them the size they now are. The pots can happily overhang the shelves as needed.
 
After this firing I’ll have a bit of a backlog of pots to glaze fire. I’ve got a few more little tweaks I want to test first and have bought a new small test kiln for glaze development. It’s due in a couple of weeks. With a smaller kiln I will be able to run more cycles of development without having to be limited in frequency by feeling the need to fill up the larger kiln.