Sunday, 29 June 2014

Post 155 Tanuki No 4 Update

Back in October last year I set up Tanuki No 4 with one of the long Sargent layerings. If you look at Post 126 you can see how much it has changed since then.

I used the plant with the two long leaders, as you can see in the lower part of the vein. They will fuse together pretty quickly. As you can see the tree has put on some great growth since October. There are quite a few branches that I've left for the time being to get the trunk well engaged. They will come off as soon as the trunk is secured and I can remove the ties and focus on developing the branches I want to keep.


This is a fantastic species for bonsai and I'm quite surprised at how well it works in our climate. After seeing them in Japan, in their winter, looking russety brown and clearly in hibernation, to be able to grow them here with only perhaps 6 or 8 weeks of slower growth in the winter creates a huge developmental opportunity.


Tuesday, 24 June 2014

Post 154 New tanuki

In the last firing I had a number of new tanukis too.


 I think this is the front of T7, Its about 300mm high and styled as a hollow trunk with two live veins. The following photos show each side.

On the sides and back I've created a number of old branch stubs. In the real old junipers as branches die off the tree seems to grow around the stubs.


The next one T8, is just a small one about 150mm high, also styled as a hollow trunk but with a single vein.


And finally a couple of small ones to create mame sized trees. These are only about 100mm high.


I have small sargents for all these and will get them installed in the spring.

Wednesday, 18 June 2014

Post 153 Glaze Crawling

I'm going to share a learning with you about glazing; one I've not experienced before and hope not to again.

My usual practice when I'm glazing pots is not to do a firing with all the one glaze on many pots. That means I mix up a number of separate batches for the different pots. With a precision scale this is possible. Because I paint the glaze on the pots I need a repeatable way to know I've got enough on. The system I've worked out in true engineering fashion is to estimate the surface area of the pot and then apply the equivalent of about 400 to 500grams of dry glaze ingredients per square meter of surface. That usually takes four or five coats of glaze.
When you get familiar with the characteristics of a particular glaze formulation this all works its way out into a repeatably successful model.

With a request for a big oval pot in a bright glossy blue glaze well of course the answer is 'sure no problem'. I had trialled a glaze a long time ago and was impressed with the colour on the test tile; just what was needed.

Because it was going to be a glossy pot I wanted to be very sure that the glaze was applied evenly and thickly enough to be certain of a uniform surface. So I mixed up a little extra and applied a little extra, as it turns out just a little extra too much. I'd never really experimented to understand how much was too much and do know that a big pot is the wrong place to run such an experiment.


This is what the pot looks like from the good side.

The closeup shows the surface better.

And then you get to the back side. It is amazing that the surface tension of the molten glaze overcomes the adhesion forces and just pulls the glaze along the surface of the pot, in some places defying gravity. Here we have classic glaze crawling, so aptly named. It looks like it has exploded off the surface but the shelf was entirely clean.

The moral of the story, well two actually; the first is that there are always surprises just around the corner to trip you up along the path of learning and more specifically when you have worked out how much glaze to apply don't mess with a successful formula and put too much on.
Now please excuse me, because having defied the kiln gods, I have to go and make another big oval pot, that needs to be glazed in a nice bright shiny blue glaze!

If you are interested in the formula for this glaze it is as follows:


Custer Potash Feldspar 40.0
Silica 23.4
Ball clay 9.5
Talc 6.7
Bentonite 2.2
Gerstley Borate 18.2
TOTAL 100.0
Cobalt carbonite 2.2
Zinc oxide 8.6
Strontium Carb 5.4


Next time I use this one I'm inclined to cut the silicon to say 18 and the zinc to 5 or 6. This will still deliver a good glossy glaze, but the original formula will work just fine - just not too thickly.


Sunday, 1 June 2014

Post 152 New pots

It's good to have another glaze firing and a batch of new pots. My last firing was a long time ago and I posted some of those pots in January and  February. I hope you enjoy this batch.


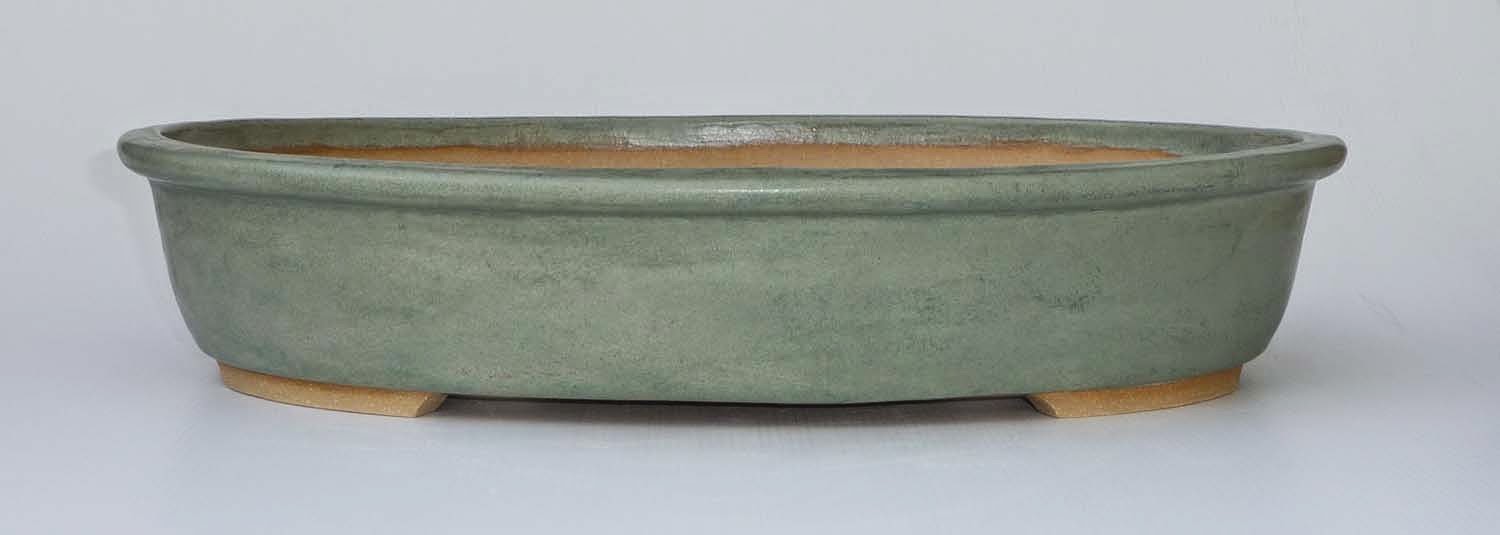
The first one is Pot 120 with a mint green satin glaze. Applied a little heavier than I have before and the colour and feel is more complete. This is a largish oval pot at 440mm x 345mm x 89mm.

I've made a couple of simple little semi cascade pots before but this one Pot 114, is something completely different. I think I commented previously that it is dimensionally the same proportions as an old chinese one I saw in a museum in Japan. A heavy application of my red brown satin glaze filled in some ot the relief definition. As you can see it is hexagonal and I have rounded over the corners to give it quite and oriental feel.
It finished up at about 155mm across the flats and 136 mm high. I've not grown any semi cascade bonsai up until recently but now have a couple of figs and bouganvillias in training. It would be nice to put one of those in this pot.

This is a little shohin S39 with a concave profiled wall, 170mm long. The glaze is a reasonably glossy one in a butterscotch colour.
This one S40 is the same patttern and size in my often used favourite satin blue.

Another shohin S38 at 190mm length, is a bowed wall rectangular pot as are the others above. It is in a light brown I've used regularly.

Same glaze here on this rectangular pot , Pot No 116 is 260mm x 192mm x 82mm. I made this one for one of my taller wide based sergent tanukis.

Pot 108 is a round pot with diameter of 195mm and height of 52mm. The glaze is a satin mustard colour. I made this one and the next which is the same size for my first two tanukis. In Post 234434 I showed an update on T2 which is headed for this pot.

Pot 112 is the same size in an antique glaze, quite a mottled colouring.

And the last one for this post is a small oval, Pot 109 in a quite metallic dark olive colour. It is 272mm x 208mm x 53mm; a useful little pot.