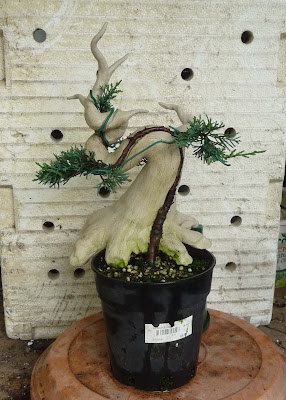
This is the first one I did using a small shimpaku that I'd grown from a cutting. They are very easy to propagate from cuttings and even from quite mature and large offcuts. All I did with this one was to wind the tree up around the prepared groove in the tanuki and then secure it there with twine, which I have now taken off for the photo. Looks better without the orange twine and the apex of the tree has grown about 25mm since being put in place.
As you will see bettter in the next photo there is a wrap of green wire around the trunk just near the apex. This is the end of the groove that needs the tree to grow another 50 mm or so for one final twist around the trunk. At this time the tree has left and right branches in the right places and there is also one to the rear for depth. It has locked into the tanuki nicely at the base already. The further apex growth will offer plenty of options to build the final apex. It has lots of growing to do but will make a nice little bonsai.
For the second tanuki I originally used a Daintree Pine - very nice fine needle foliage llike a She-Oak. The trunk broke a number of times when getting it in place but it recovered and started to grow quite well, when with a change in watering conditions it just keeled over. Interesting try but perhaps just the wrong place.
I really like the shimpakus and despite their slow growth pattern thought I'd go back with another. This one I bought only last week and have just installed it.
This is the front. I cut the pot down to get the tree as well advanced along the prepared groove as the roots would allow - should have done this with the first one too. The timber at this age and diameter is quite flexible and not fragile so it went into place easily. The trunk has locked into place and needed little to hold it there.
That first branch on the right is in totally the wrong place and has been retained as a sacrafice branch only. It will have to go at some point in the future. The left hand branch has come over from the rear as you can see in the picture of the back. I'll probably loop it down lower.
Final planted depth will see the soil level at the point of junction of the tanuki 'fingers', about at the line of the holes in the poly box behind.
This picture shows a little better the fit of the trunk to the prepared groove. It will grow to fill up the space. This tree has better early branching structure and will offer plenty of future options
Picture from the rear.
They need a few years to develop now but it is quite nice to know that the 'deadwood' is totally maintenance free and definitely going to outlive the tree! I have been thinking about another small shimpaku I've been developing for a few years - also from a cutting. Actually make that lots of years. Anyway with the wonders of photoshop I've been thinking about how I could fashion a tanuki for it.


No comments:
Post a Comment
Happy to hear your advice, feedback or questions